MacroFactor has the fastest food logger on the market. This article will teach you the ins and outs of MacroFactor’s food logging system so that you can maximize food logging speed, and minimize logging friction.
You can launch into one of MacroFactor’s food logging workflows seven different ways:
On both Android and iOS, there are widget options that let you launch into the food search and barcode scanning workflows with a single tap.
When you press and hold the MacroFactor app icon, you’ll pull up a menu that will allow you to launch into the food search or barcode scanning workflow.
You can configure your toolbar to allow you to launch into any of the food logging workflows with a single tap from your Dashboard, Food Log, or Strategy page.
Launch your quick actions menu by tapping the large “+” button at the bottom of the screen on all primary pages of the app. From the quick actions menu, you can launch into any of the food logging workflows.
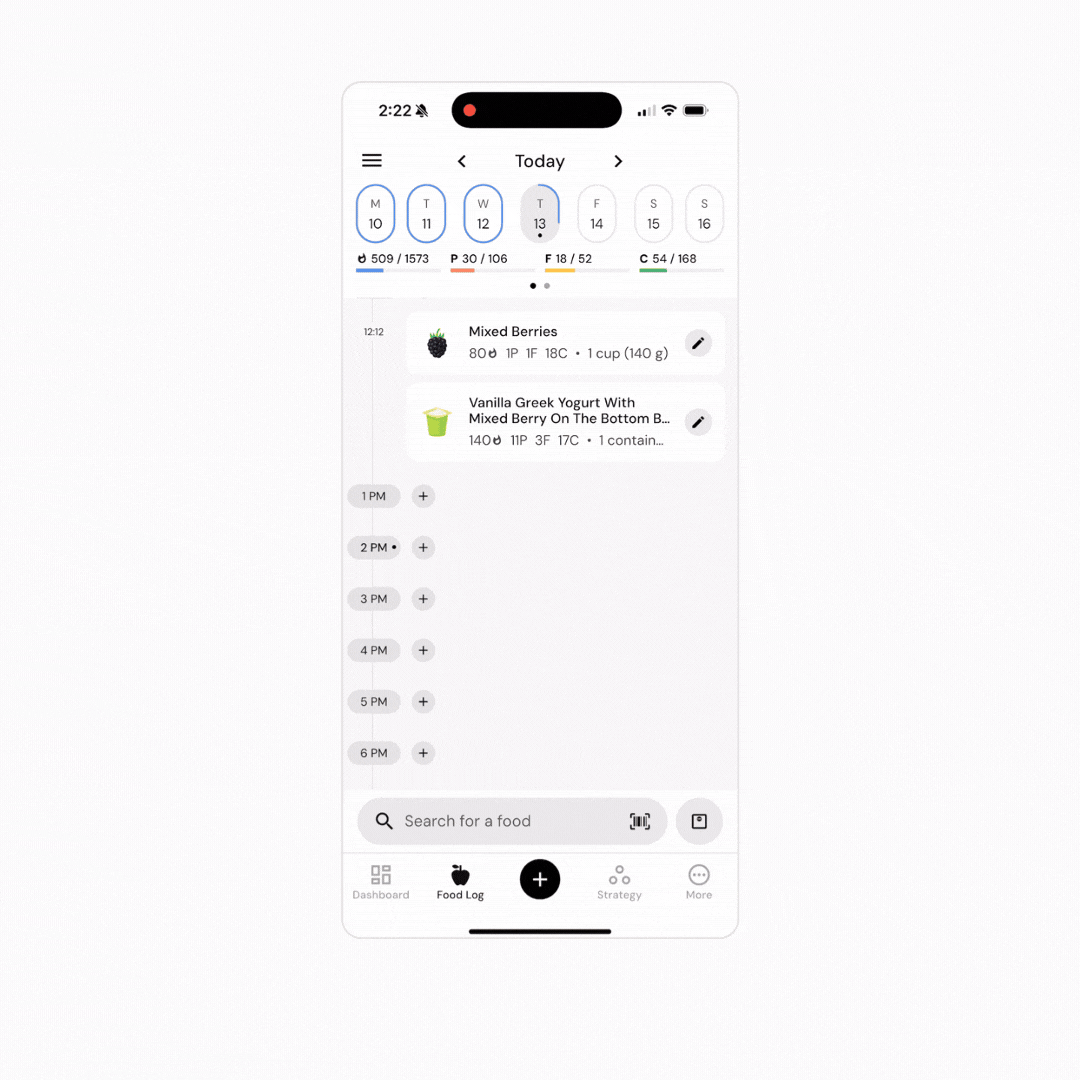
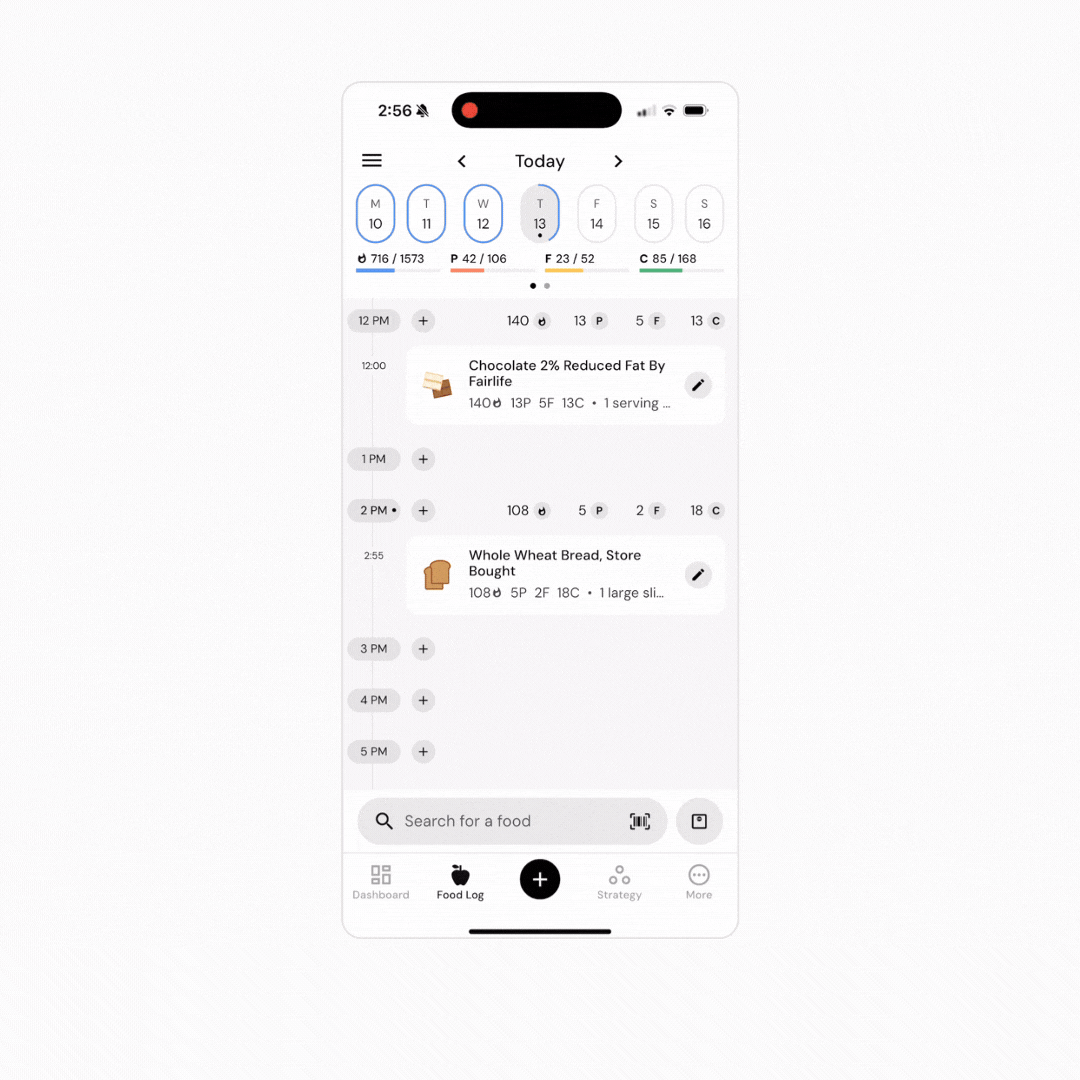
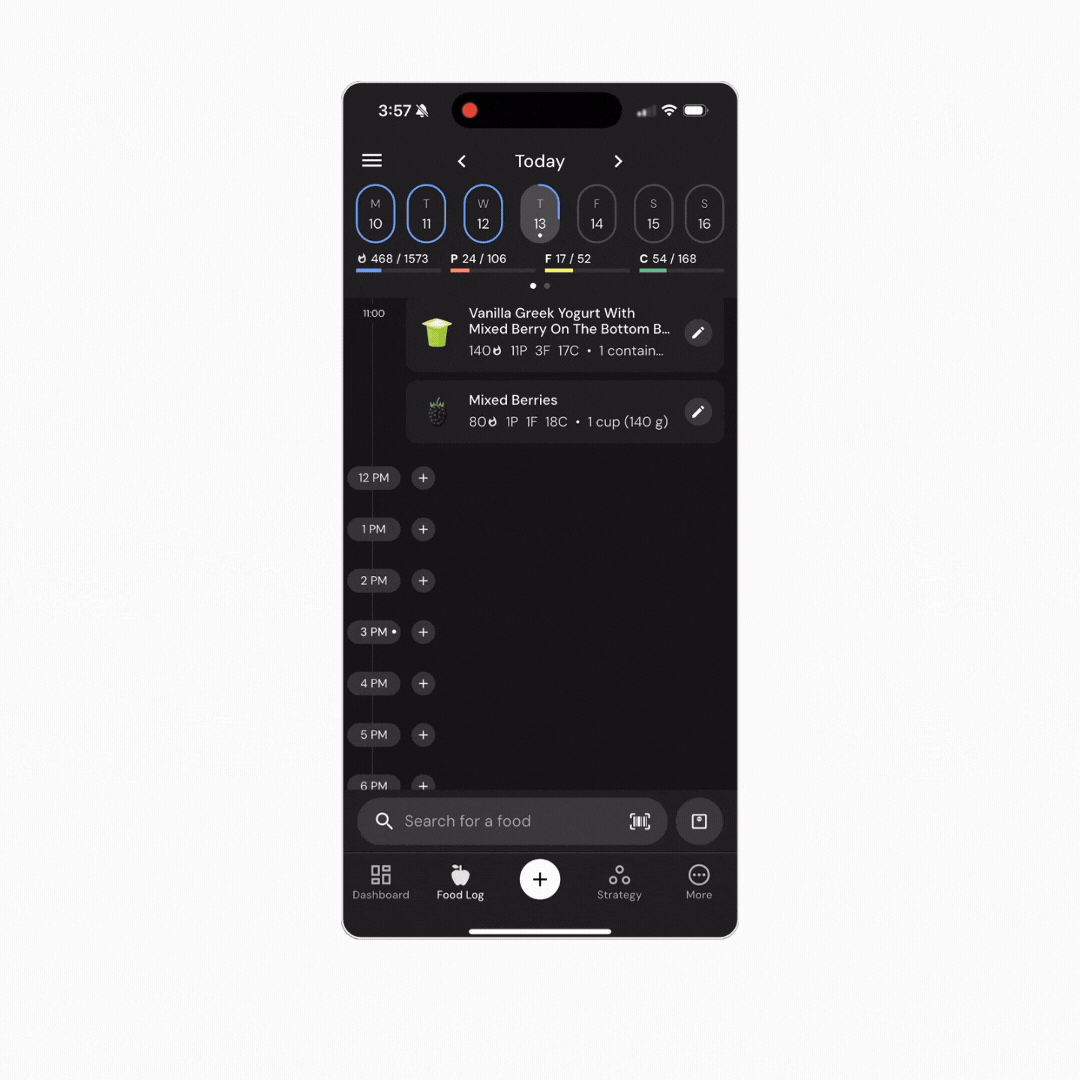
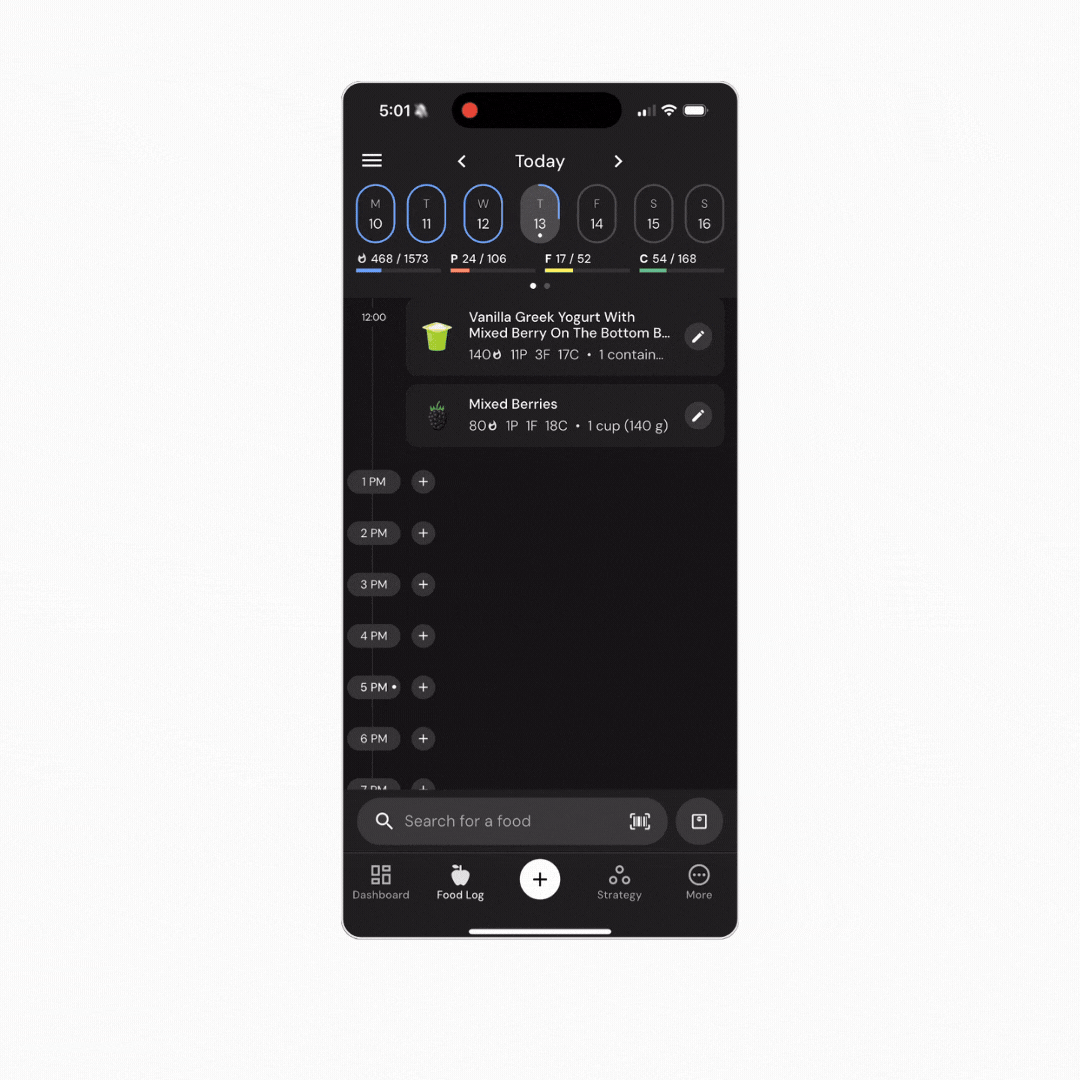
Tap the small “+” button beside any hour on your food timeline to launch the food search workflow. When you initiate food logging via this method, you’ll be logging food to the hour you selected.
Alternately, if you switched from “Plus icon next to each hour” to “Long-press hour shortcut” in your Food Timeline settings, you can launch this food logging workflow by long-pressing the icon for the hour itself.
When you create a custom food, you can tap “Create & Add” to simultaneously save your custom food and add it to your plate. From there, you can access any other food logging workflow.
When you create a recipe, you can tap “Create & Add” to simultaneously save your recipe and add it to your plate. From there, you can access any other food logging workflow.
There are five primary methods of logging food in MacroFactor: barcode and label scanning, food search, quick adding, Describe, and logging custom foods or recipes. All five of these food logging methods are always accessible within MacroFactor’s unified food logging system, such that you can seamlessly scan the barcode for one item, then search for another, then add a custom food, and then add more foods via Describe from the same interface.
Every food logging method is always accessible via the ribbon near the top or bottom of the food logging interface. If you have the barcode scanner pulled up, you can tap “Search” to shift to food search, or swipe from left to right and tap “Library” to pull up your custom foods or recipes. So, if you accidentally launch the wrong food logging workflow (for example, if you tapped the barcode scanning button from your toolbar, but you meant to tap the search box), or if you need to log a meal via multiple food logging methods, you can always easily switch between food logging methods with a single tap.
“Scan” pulls up the barcode and label scanner. Simply move the barcode or label you’d like to scan into the middle of the scanner, and MacroFactor will pull up the corresponding food if it’s present in the database (barcode), or read the data from the nutrition label (label scanner).
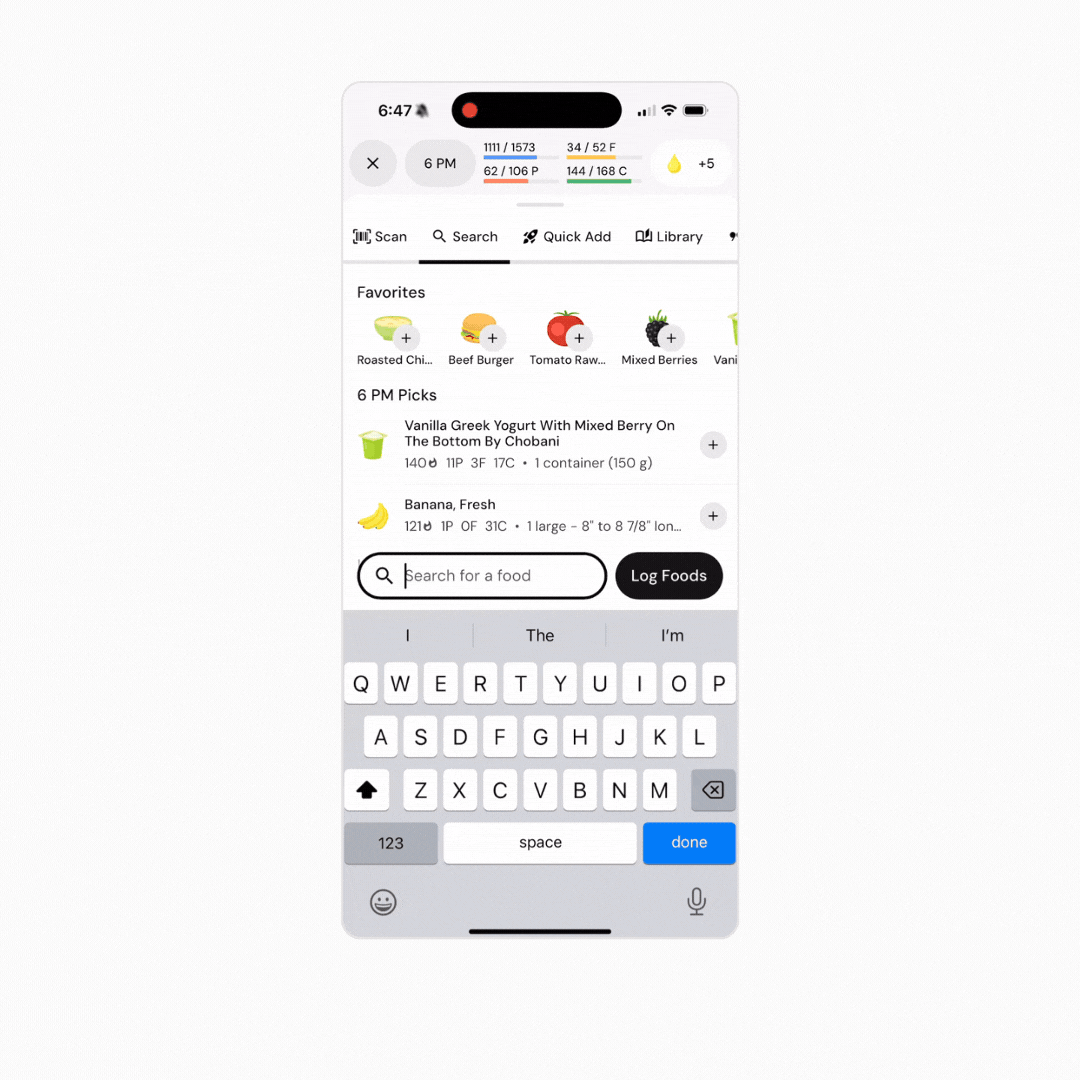
“Search” pulls up the food search interface.
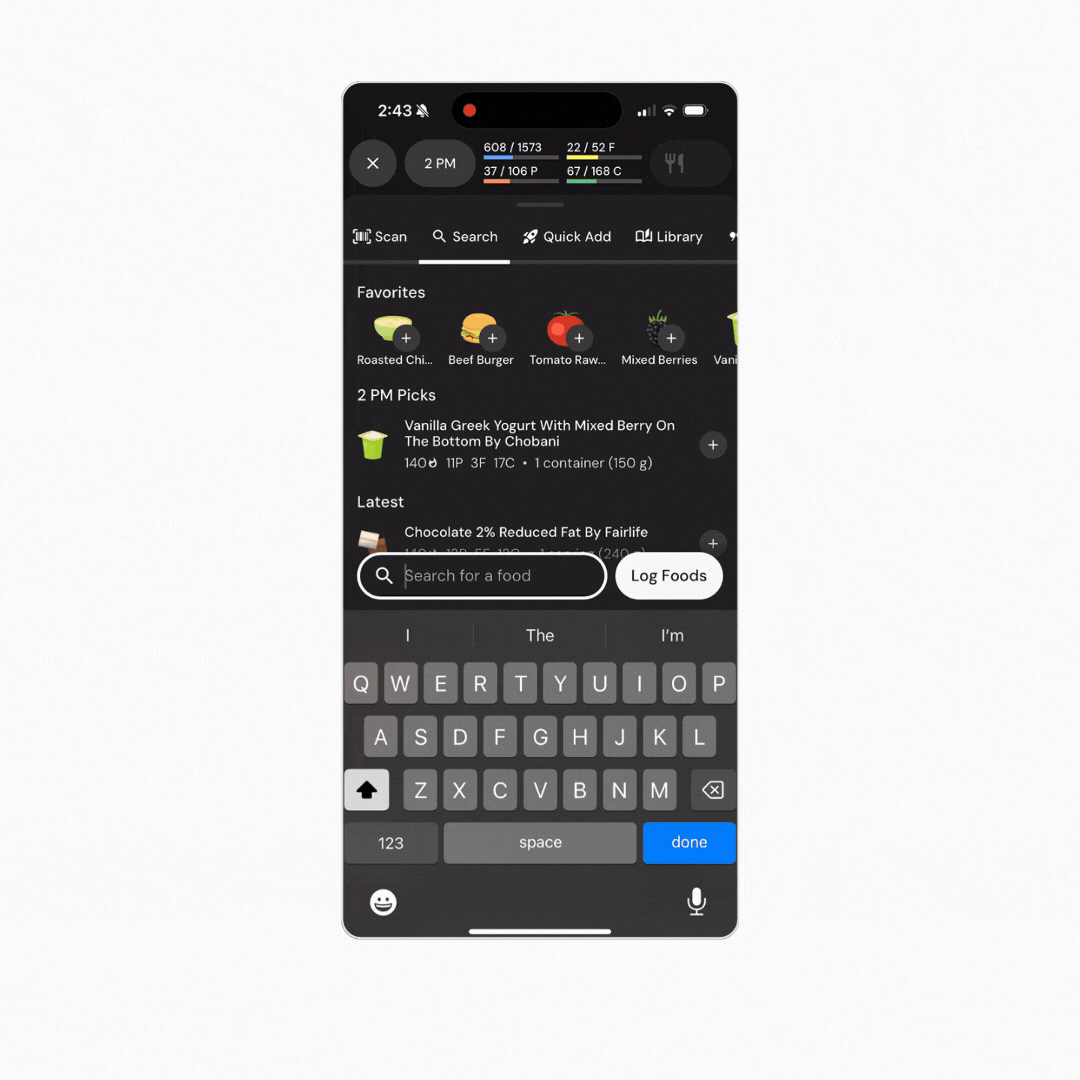
Before you type anything into the search box, three categories of foods can load automatically: your hourly go-tos, your favorited foods, and a list of the foods you’ve most recently logged.
Any foods that you add to your favorites will appear at the very top of the search screen. You can scroll left or right to view more of your favorite foods in this section.
Your hourly go-tos are the foods you most frequently log during or near the hour you’re currently logging foods to. For example, your “1pm Go-Tos” are the foods you most commonly log between about 12pm and 3pm, with extra weight given to the foods you most commonly log during the 1-2pm hour. Hourly go-tos are determined by both recency and frequency. If you’d like to delete a suggestion from your hourly go-tos, check out this article from the knowledge base.
Below your hourly go-tos are your “Latest” foods. To see your “Latest” foods, scroll down to dismiss your keyboard. These are simply the foods you’ve logged most recently. So, if you eat a lot of the same foods each day, those foods should stay near the top of your “Latest” list, allowing you to log them without needing to search for them each day.
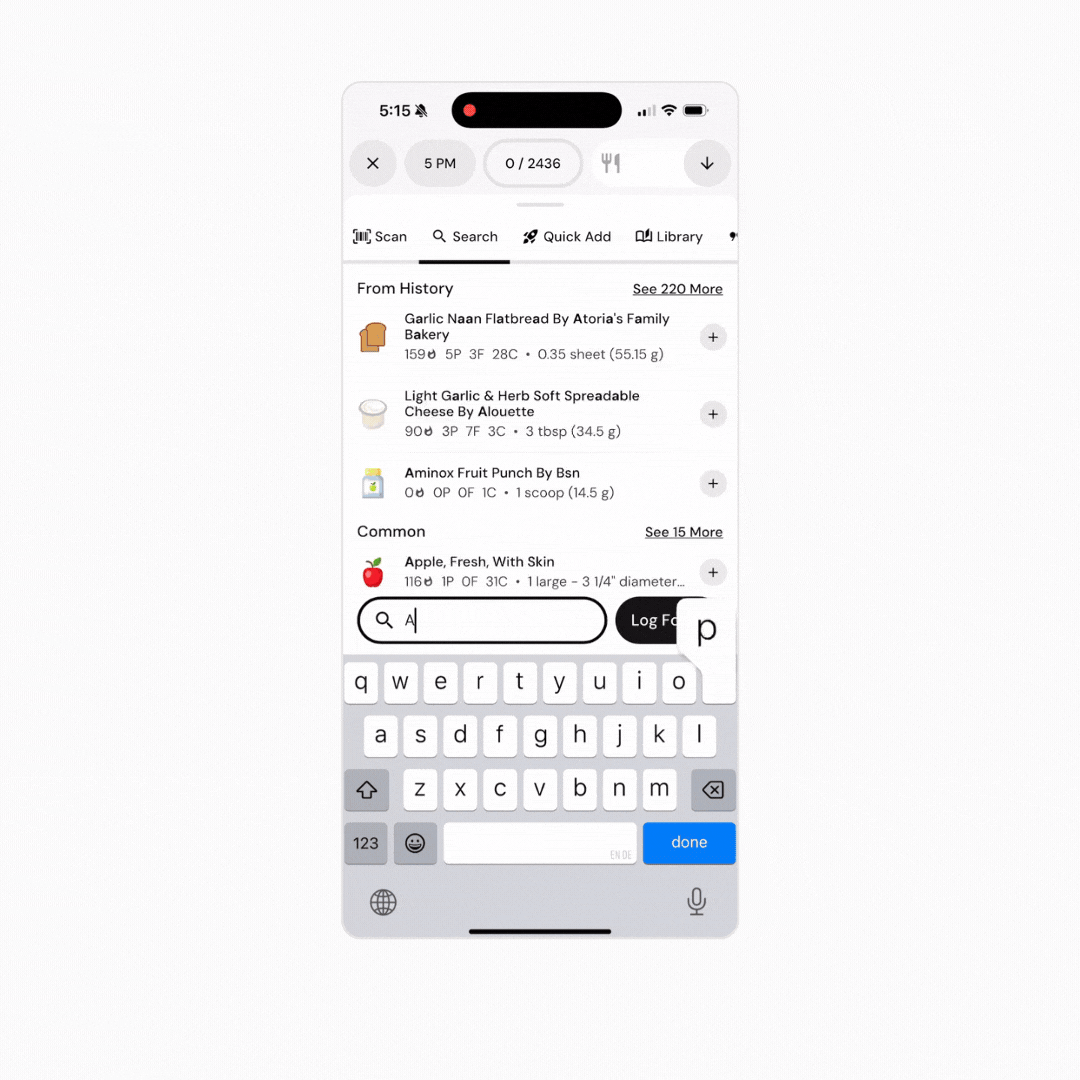
Once you start typing in the search box, MacroFactor’s search algorithm will start querying the search database to deliver results. The results are organized into (up to) 4 categories: From History, Custom, Common, and Branded. Scrolling down will dismiss your keyboard so that you can see foods in all four categories.
“From History” foods are foods that you’ve previously logged. Since most people frequently eat a lot of the same foods, foods you’ve previously logged will always show up at the top of your search results, if you’ve previously logged foods that match your search query.
“Custom” foods are the custom foods and recipes you’ve created. If your search query matches part of the name of any of your custom foods or recipes, these foods will show up below your “From History” results. Of note, if you’ve previously logged a custom food or recipe, it can also show up in your “From History “ results.
“Common” foods are foods sourced from research-grade food databases with robust micronutrient reporting. These foods show up after “Custom” foods in your search results. Common foods are listed above branded foods in your search results because most users log most branded foods via barcode scanning.
Finally, “Branded” foods are foods from other manufacturers that (often) don’t have robust micronutrient reporting, and that haven’t been analyzed and added to research-grade food databases. Branded foods typically return the most numerous search results, which will be listed at the bottom of your combined search results. If you’re trying to search for a particular branded food product, be sure to include the name of the manufacturer or restaurant you purchased it from.
On the right side of your “From History,” “Common,” and “Branded” search results, you may see an arrow pointing down with a number beside it. This tells you that there are more foods within the category you can view by tapping the arrow. For example, a search for “Apple” initially returns 5 “Common” food results, but there’s also an arrow with “+15” beside it. If you tap the arrow, you’ll load 15 more “Common” food results for “Apple.”
“Quick Add” pulls up the quick add menu. Quick add allows you to easily log the calorie and macronutrient information for foods or meals you don’t expect to eat frequently. Quick-adds aren’t saved for future searching, so if you expect that you’ll want to log the same food or meal again in the future, you should create a custom food or recipe instead.

To quick add the basic nutrition information for a food or meal, just fill in the applicable cells (Energy, Protein, Fat, Carbs, and Alcohol), and give your quick-add a name (if you want – the name is just for your reference when reviewing your day of eating).
“Library” loads your personal database of favorite foods, custom foods and recipes you’ve created and saved, and the custom foods and recipes that have been shared with you by other users. You can toggle between your favorites, recipes, and custom foods, and you can specifically search for these by name using the search bar. You can also tap the button with three lines of descending length to change how they are sorted: in alphabetical order, in reverse alphabetical order, or by date created (with more recently created custom foods or recipes at the top).
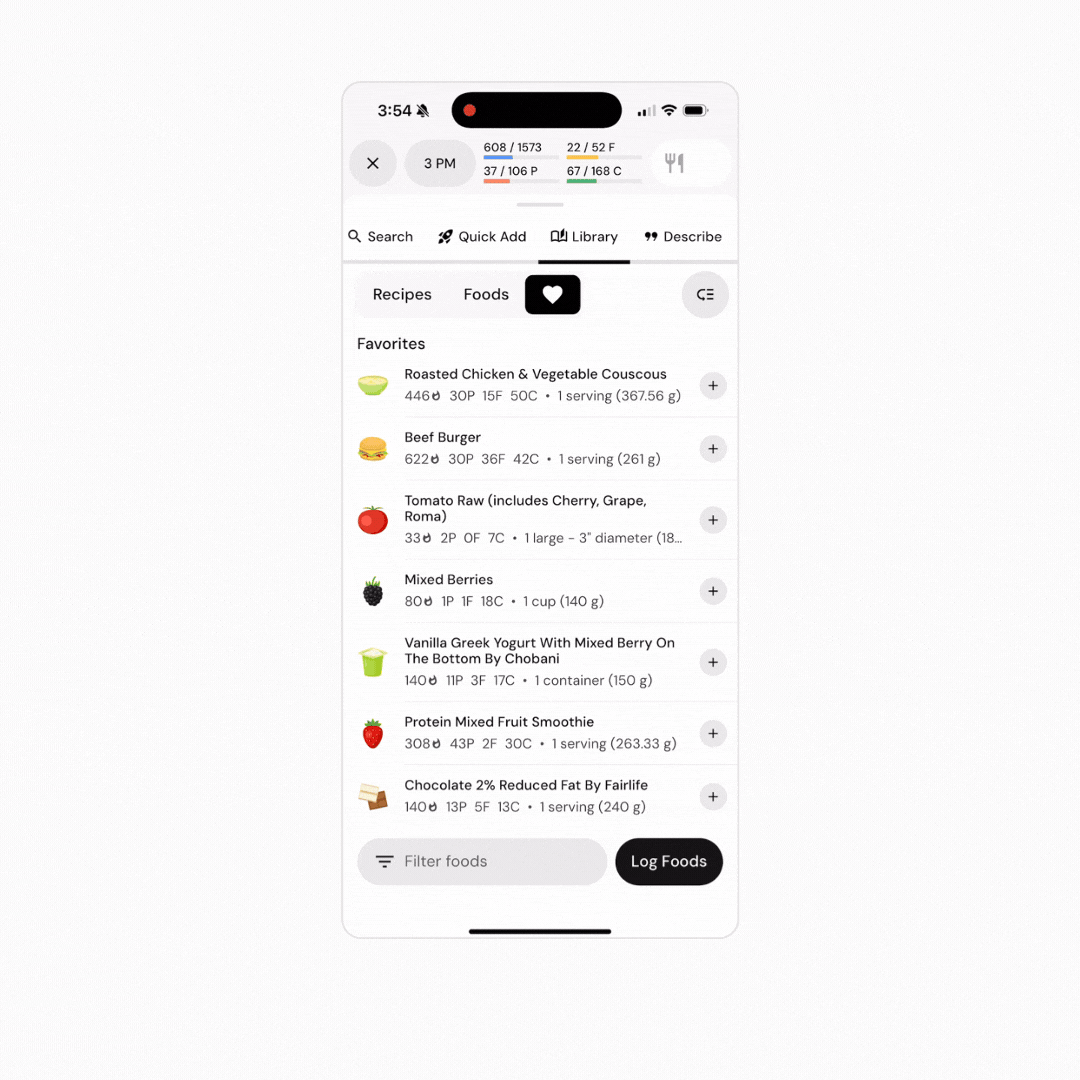
You can also tap the prominent + button to create a new custom food or recipe, which you can then “Create & Add” to log it immediately after creating it, along with any other foods you’re logging in your current meal.
When in the Favorite Foods menu, you can tap the icon next to the heart (an arrow with three lines) to toggle on Sorting, allowing you to organize your favorites however you'd like!
“Describe” lets you log foods via natural language search. Just type (or speak) a description of your food or meal, and MacroFactor will search a common foods database for results that match your description. For more on getting the most out of Describe, you should check out the dedicated article about Describe in the knowledge base.
Note: All of the information below describes how you add food to your plate in Speed Mode, which is the default for all new users. The differences between Context Mode and Speed Mode are discussed here.
MacroFactor’s plate-based food logging system is what enables all of our food logging workflows to be unified within a single interface, and it’s a key factor contributing to the speed of MacroFactor’s food logger when you’re logging meals consisting of multiple foods.
In all food logging workflows except for Describe, two options will be available to you after selecting a food: “Add” and “Log Foods.”

“Add” is in the bottom right corner of your keyboard, and persists in the bottom right corner of your screen if you dismiss your keyboard after selecting a food. Tapping “Add” will add the food to your plate. If you’re logging multiple foods within a single meal, we’d recommend tapping “Add” for each food, and only tapping “Log Foods” after you’ve added all of the foods you’d like to log for the meal.
“Log Foods” is right beside “Add” when you select a food, or when you’re engaging with any of the food logging workflows. If you’re viewing your plate, “Log Foods” will be near the bottom right corner of your screen. If you tap “Log Foods,” you’ll log everything you’ve already added to your plate, including the food you’ve currently selected. So, if you’re only logging a single item, we’d recommend tapping “Log Foods” after selecting the food you’d like to log. If you’re logging multiple foods within a single meal, we’d recommend tapping “Add” after selecting most of the foods you’d like to log, and tapping “Log Foods” after selecting the last item you’d like to log for the meal.
If a barcode scan successfully returns a food in MacroFactor’s barcode database, a screen will pop up with the name of the food at the top, followed by the Calorie and macronutrient content of the food.
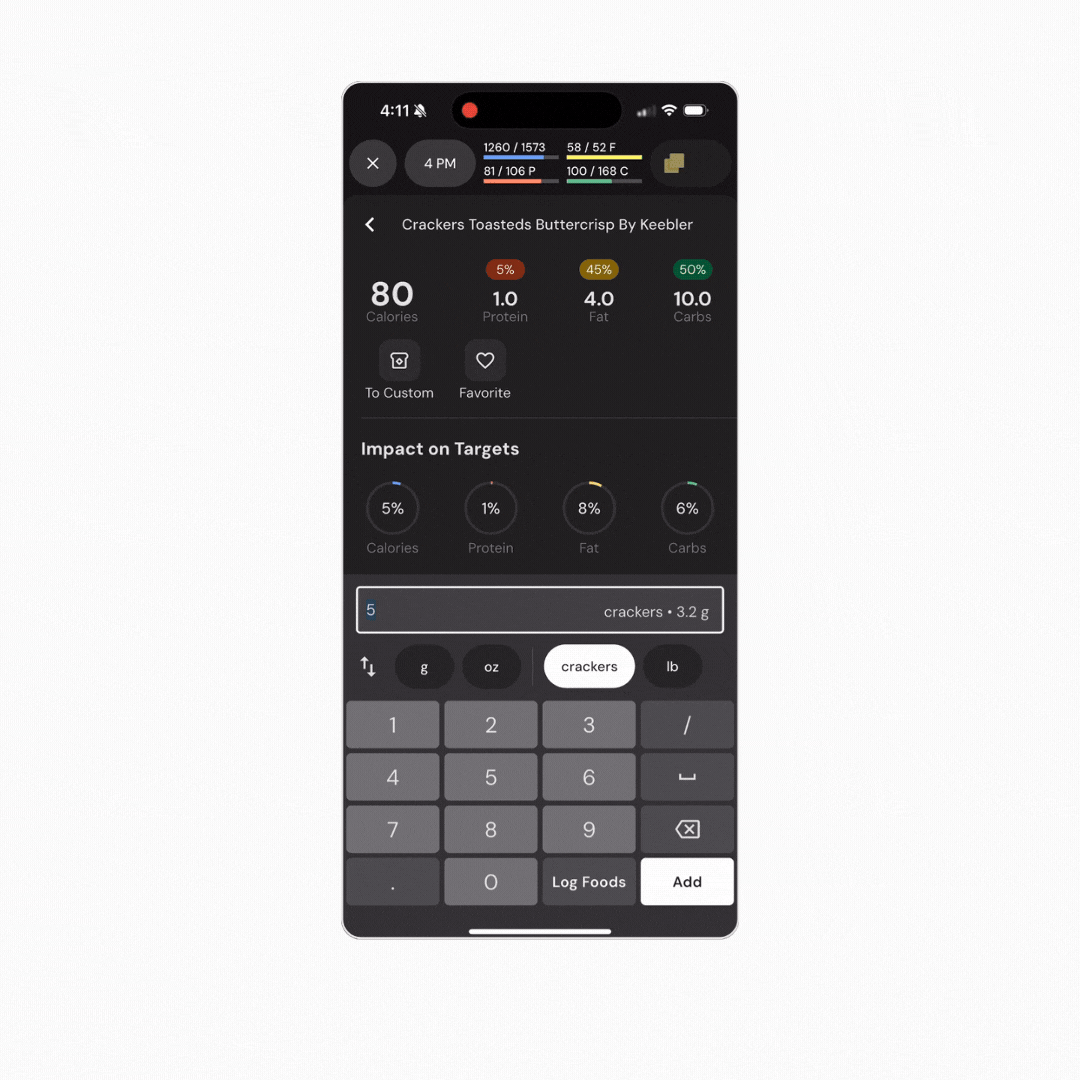
From this screen, you can change the units and quantity of the food before you add it to your plate or log it.
After editing the units and quantity of the food (if necessary), you can tap “Add” to add the food to your plate (recommended if you plan to log more foods within the same meal), or “Log Foods” to log the food, along with any other foods currently on your plate (recommended if it’s the only item you’re logging, or the last item you’re logging for your current meal).
You can also tap the arrow near the top right of the screen to dismiss this food without adding it to your plate or logging it.
If you’d like to edit the food in any way, you can tap “To Custom.” For more on this option, see this article in the knowledge base.
Finally, you can scroll down on this screen to view more nutrition information about the selected food.
To add a food via search, you have two options:
1) You can tap the small + button on the right size of the food tile to multi-add the food.
This will add the food to your plate without any intermediate screens, so that you can add multiple foods to your plate from a single search result. This option is especially helpful for saving time when adding foods from your hourly go-tos, or from your list of “Latest” foods.
2) Tap the food.
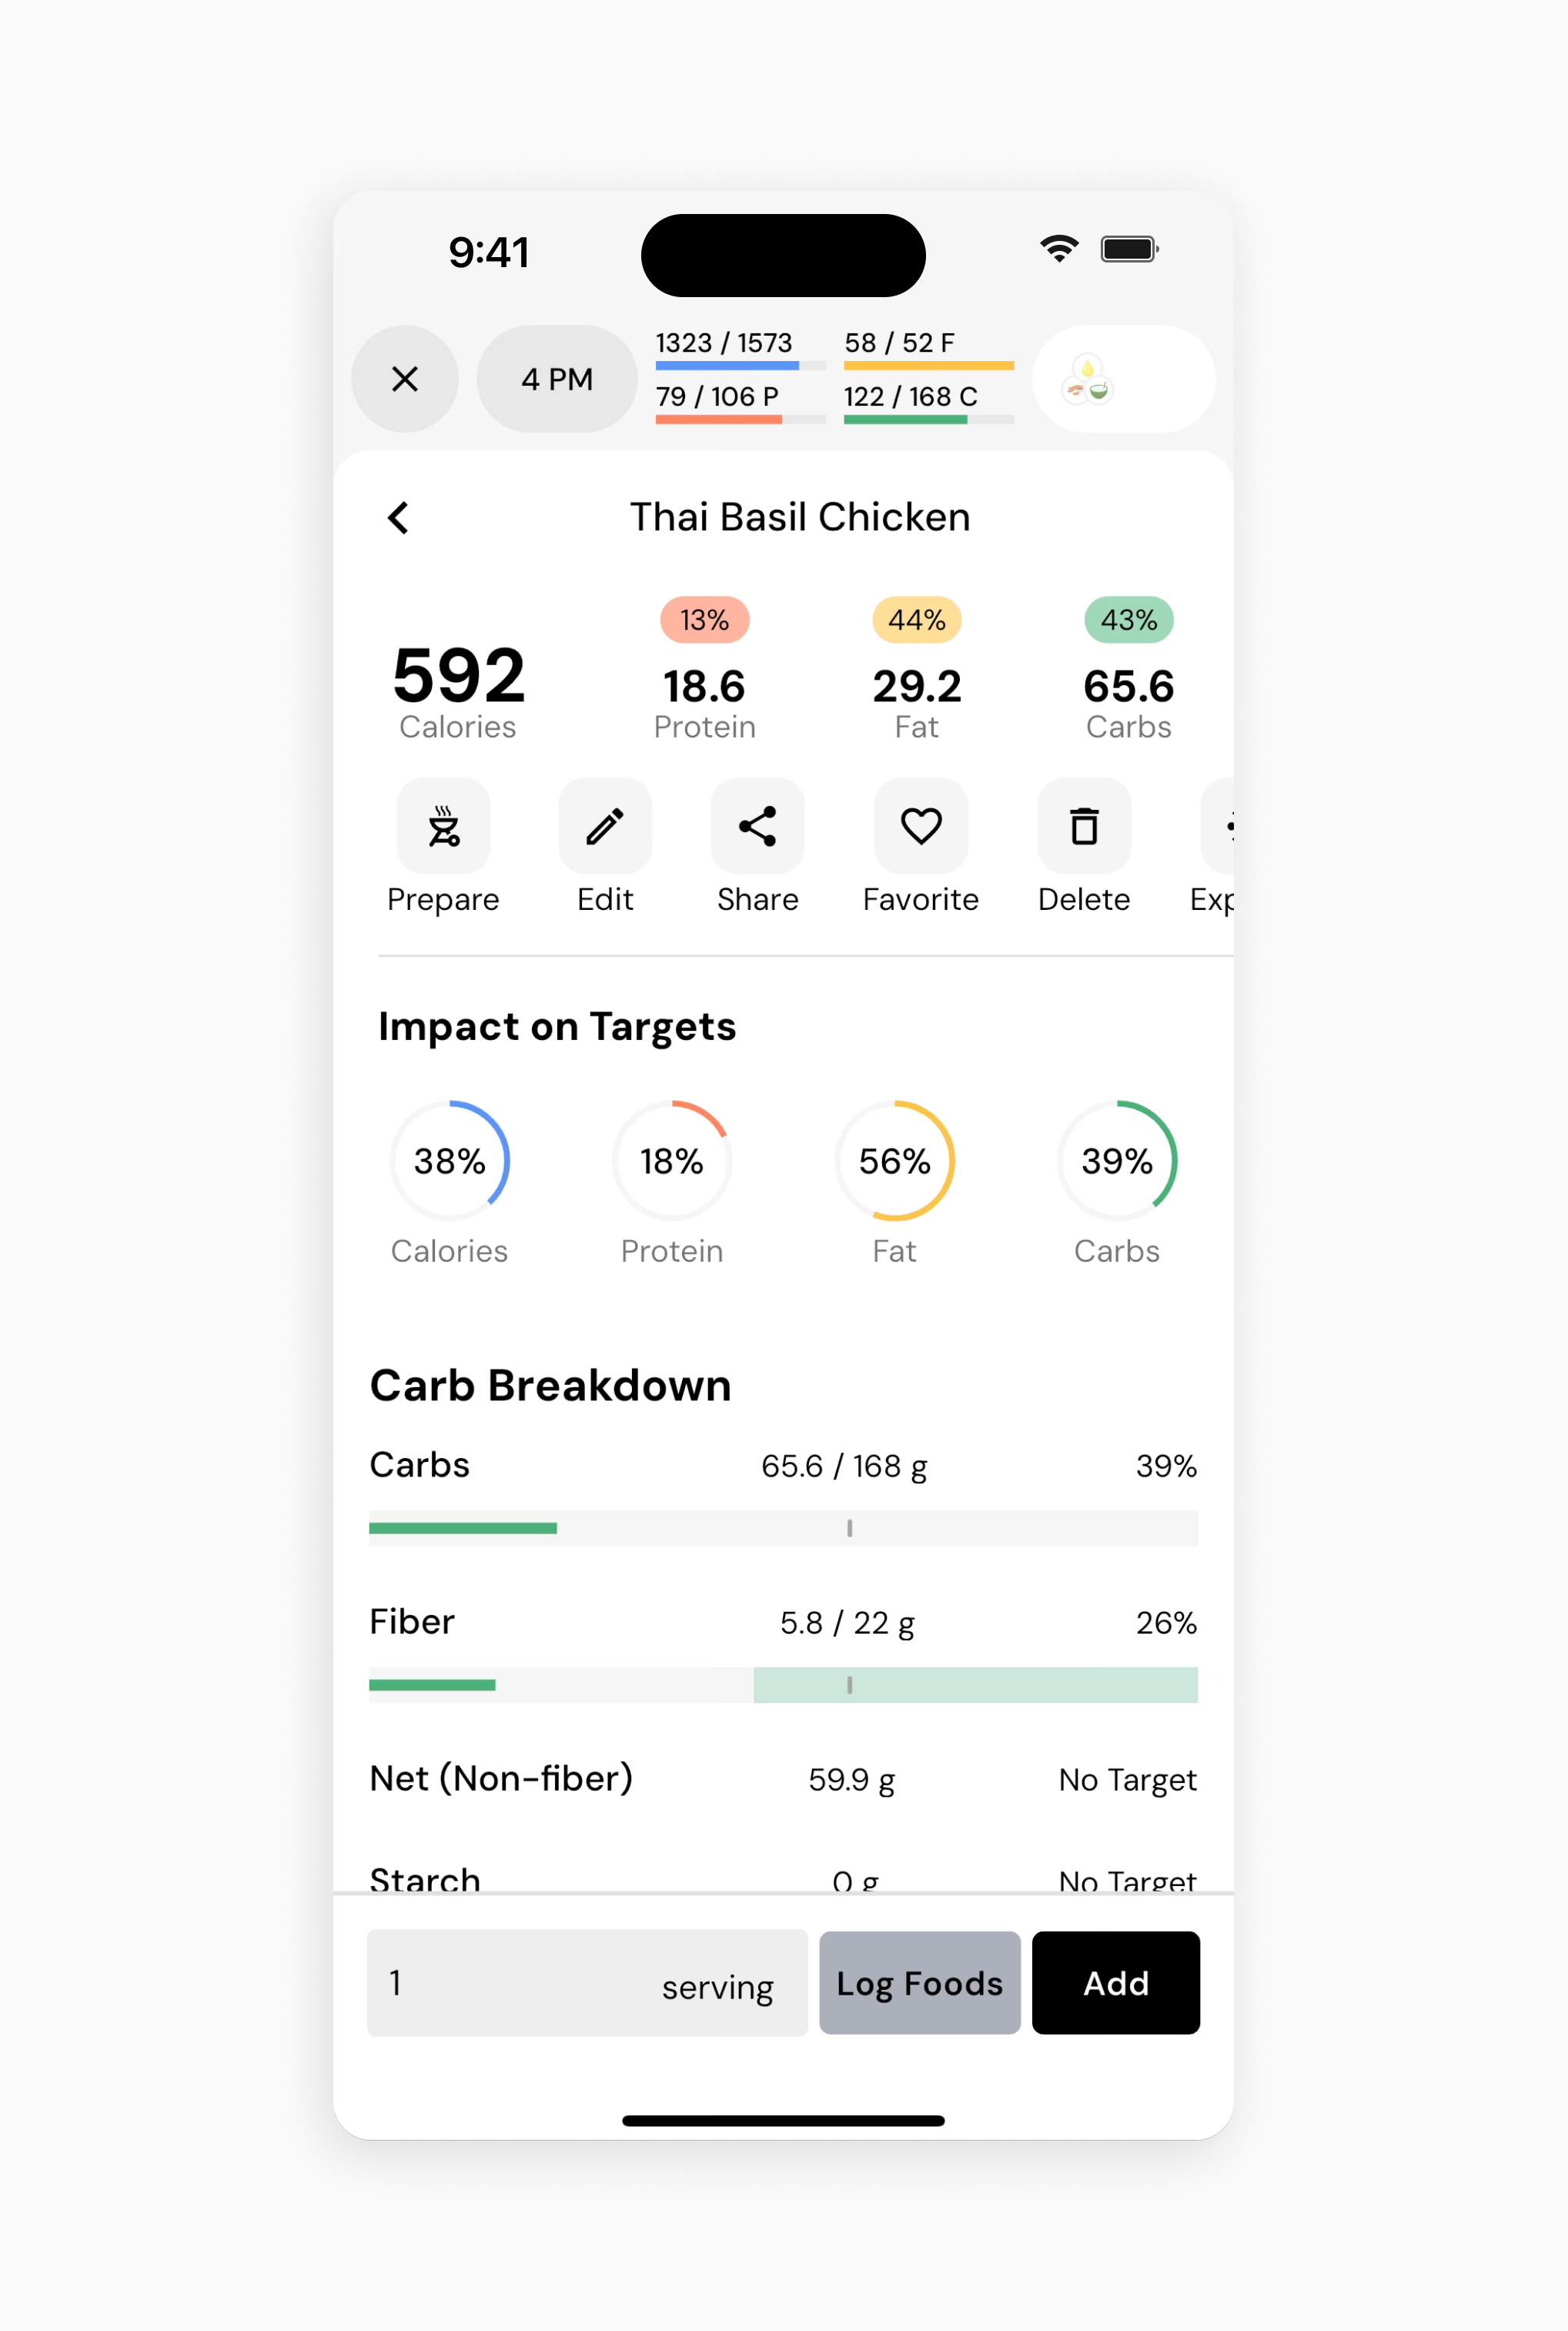
After tapping a food, a screen will pop up with the name of the food at the top, followed by the Calorie and macronutrient content of the food.
From this screen, you can change the units and quantity of the food before you add it to your plate or log it.
After editing the units and quantity of the food (if necessary), you can tap “Add” to add the food to your plate (recommended if you plan to log more foods within the same meal), or “Log Foods” to log the food, along with any other foods currently on your plate (recommended if it’s the only item you’re logging, or the last item you’re logging for your current meal).
You can also tap the arrow near the top left of the screen to dismiss this food without adding it to your plate or logging it.
If you’d like to edit the food in any way, you can tap “To Custom.” For more on this option, see this article in the knowledge base.
Finally, you can scroll down on this screen to view more nutrition information about the selected food.
After filling out the relevant Energy, macronutrient, alcohol, and/or Name cells on the Quick Add screen, you can tap “Log Foods” to log the quick-added nutrition information, along with any other foods currently on your plate (recommended if it’s the only item you’re logging, or the last item you’re logging for your current meal). Otherwise, tap “Quick Add” to add the quick-added nutrition information to your plate (recommended if you plan to log more foods within the same meal).
Adding a food from your favorites food list, custom foods list, or recipe list works exactly the same way as adding a food via “Search.”
The only difference is that a few more actions are available to you after selecting a food.
Instead of the “To Custom” option, you’ll have options to “Edit,” “Share,” “Duplicate,” and “Delete” custom foods. Recipes give you all of the options that custom foods do, along with “To Custom,” “Prepare,” and “Explode.” Lastly, you will have the ability to edit or delete any favorited food item.
After describing a meal in Describe, tap “Find Foods.” This engages the natural language search, and Describe will add the foods matching your description to your plate.
From there, you can review the results on your plate, make any necessary edits, and then tap “Log Foods” (or keep logging more foods through any other food logging workflow).
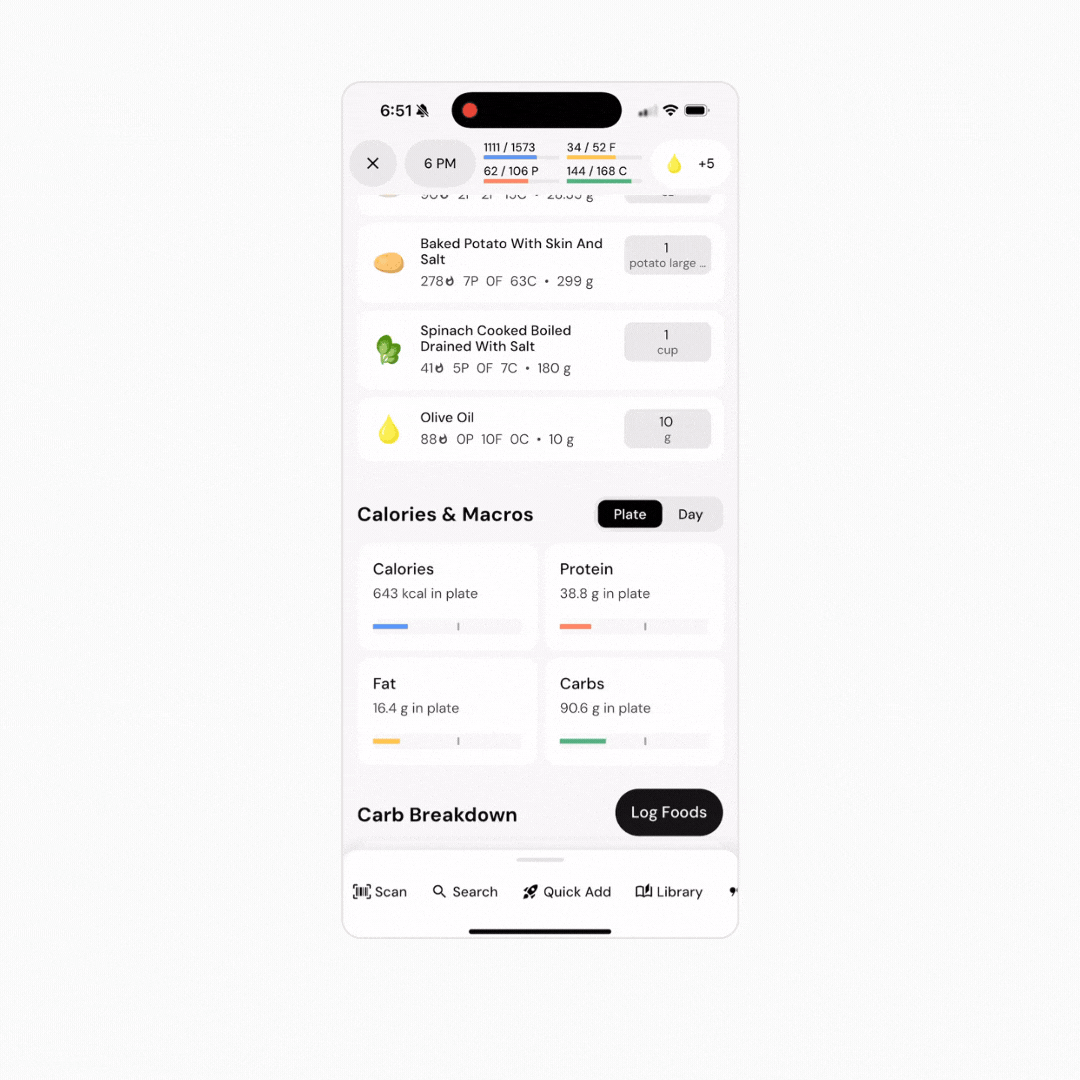
Your plate allows you to stage, review, and edit your meal before logging it. To access it at any time, swipe down on the menu where you’d select a food log workflow, or tap the down arrow near the top right of your screen (depending on the Plate Banner options you’ve selected).
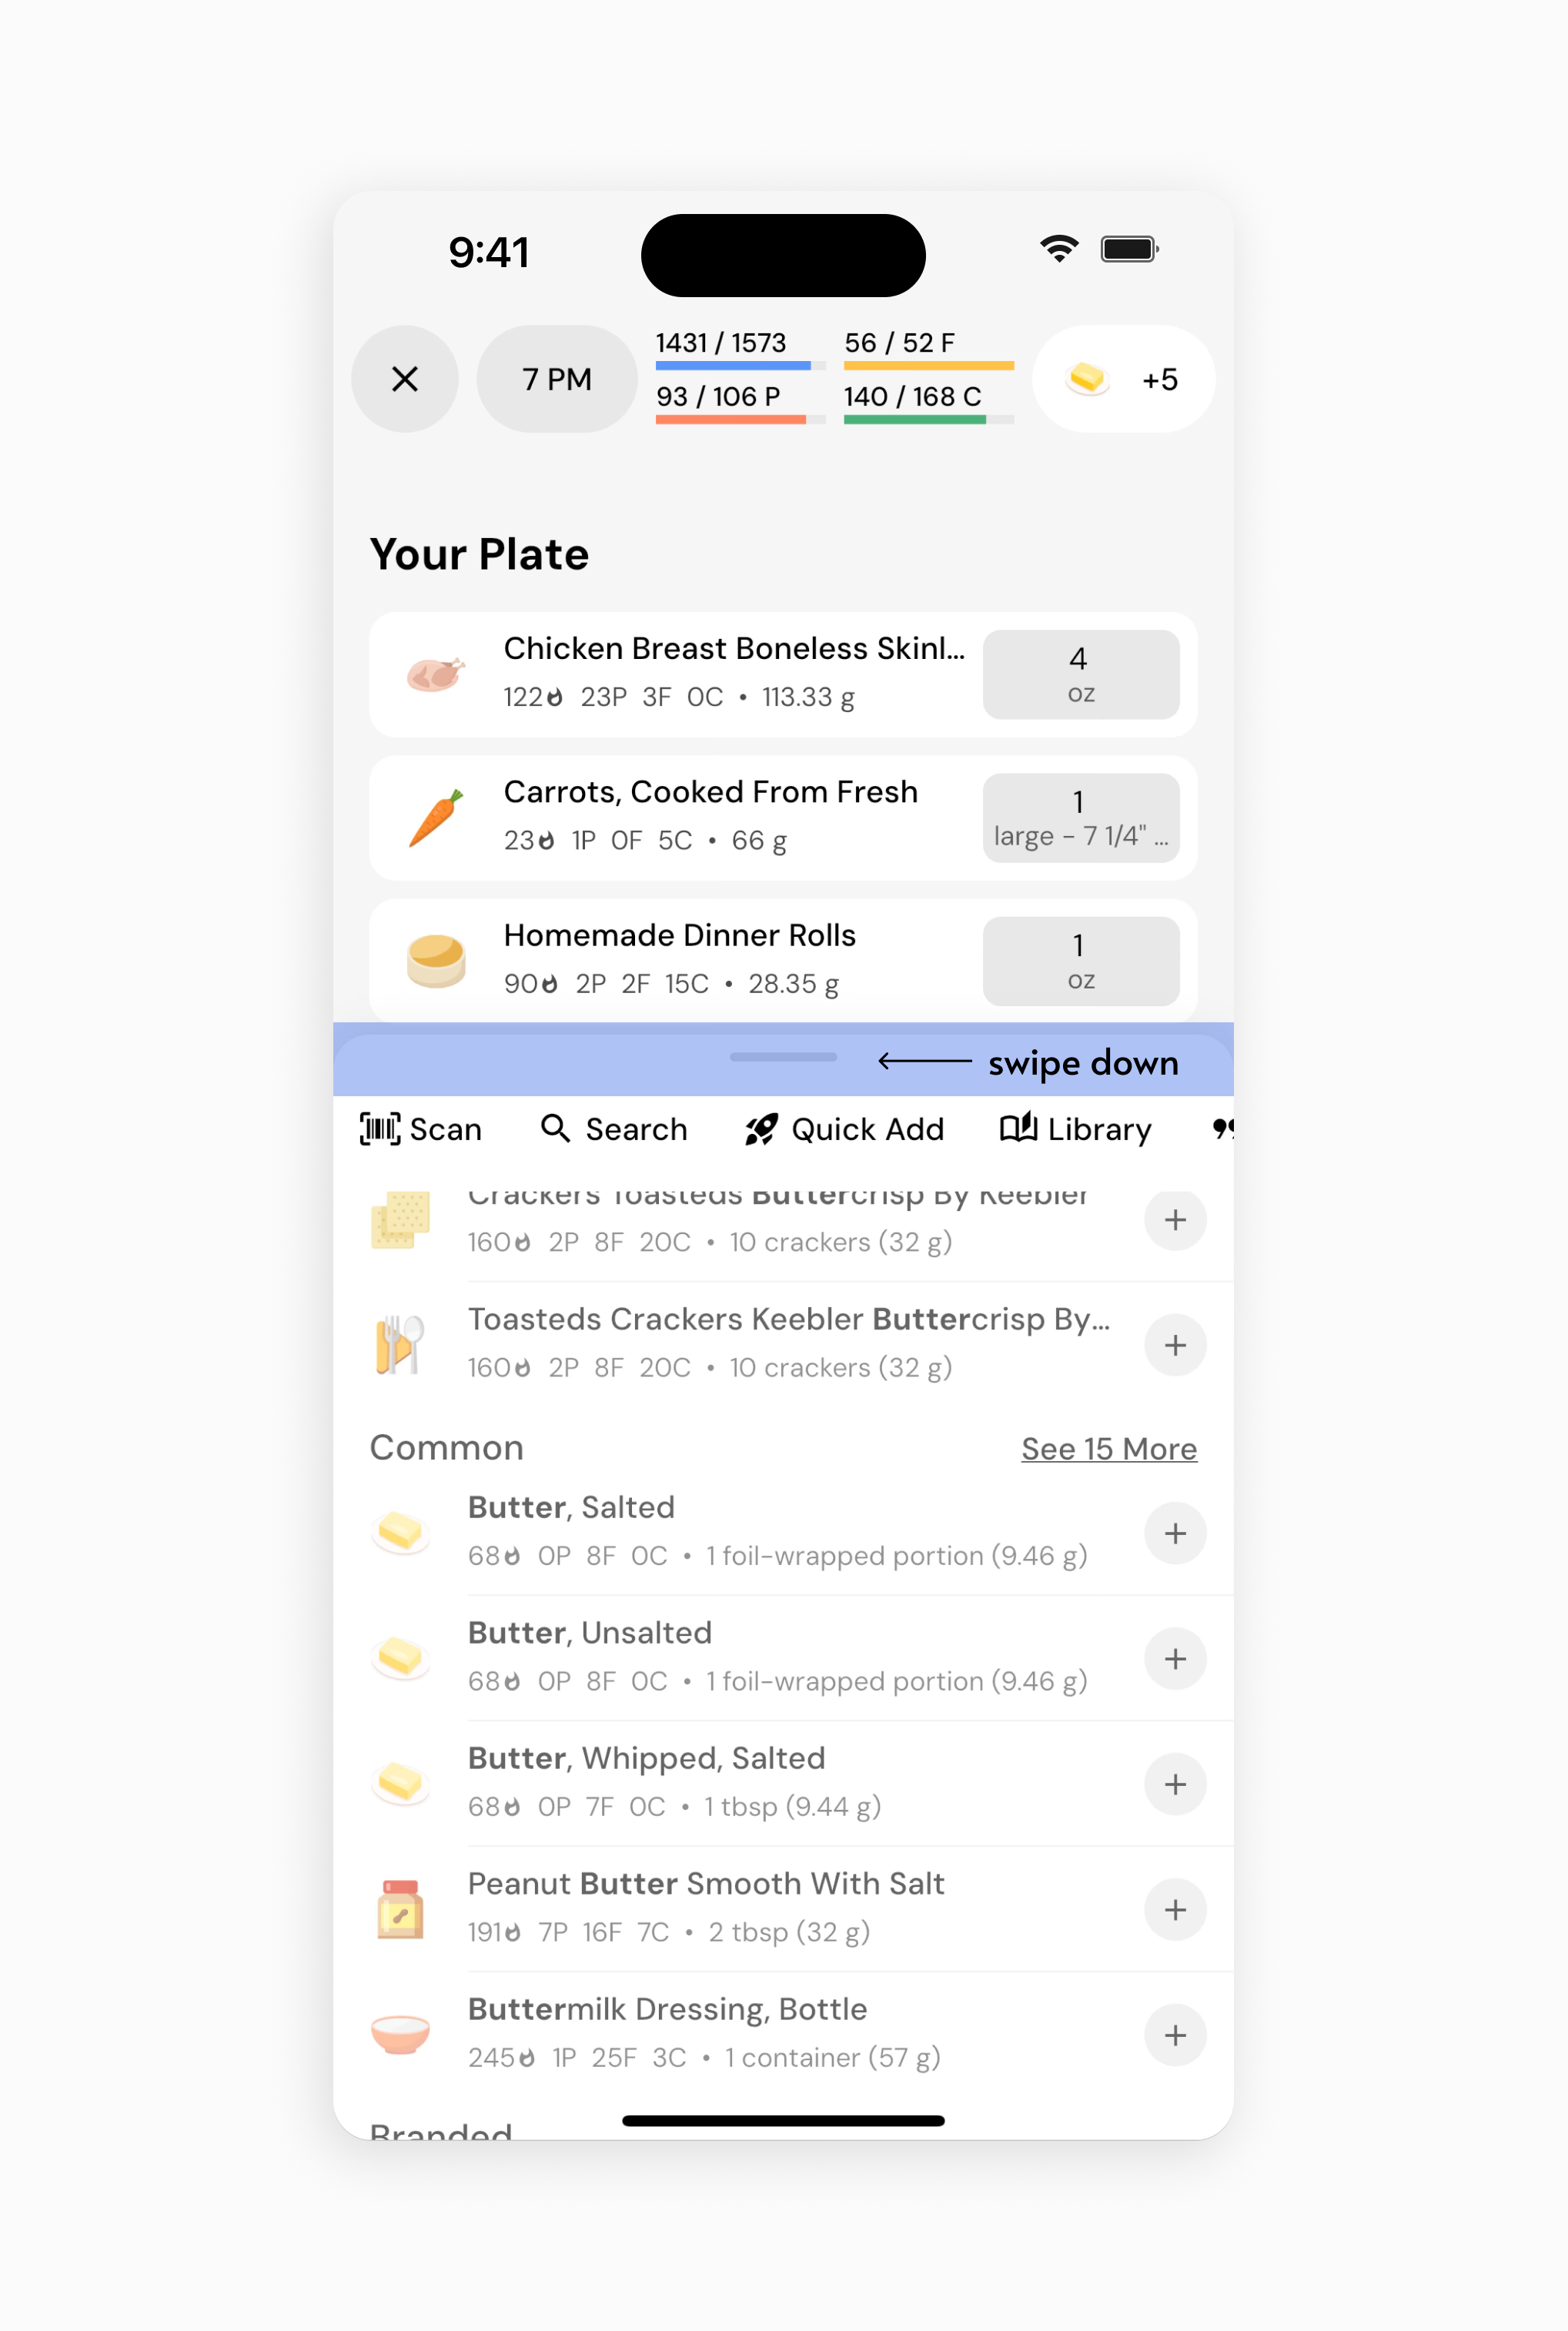
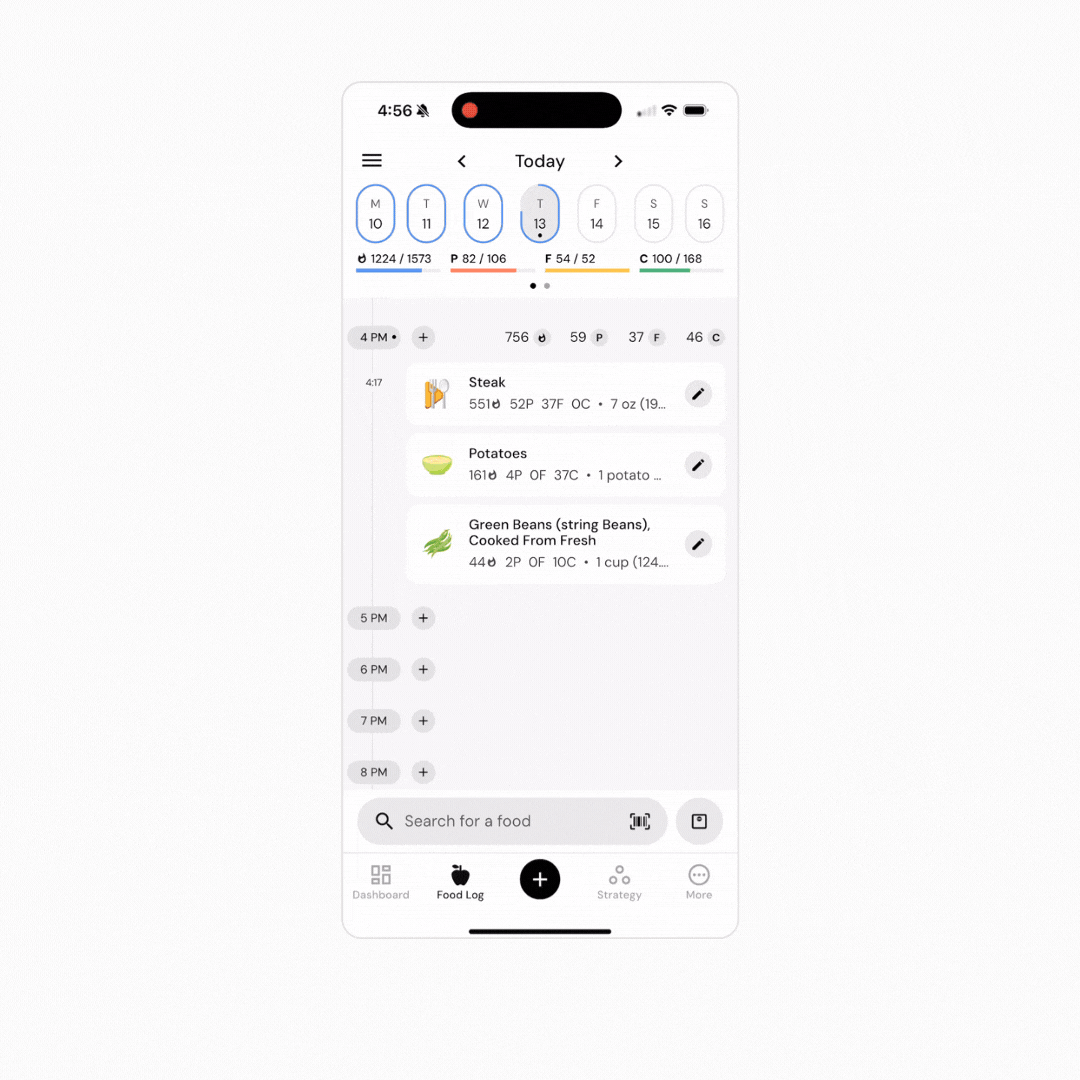
From your plate, you can review any of the foods you’ve added before you log them. If you need to make edits, tap the box to the right of a food showing the unit and quantity of the food you’ve added to your plate. You can also tap “remove” to remove foods from your plate.
If you’re logging a recipe, you can tap on the drop-down menu labeled ‘Expand Ingredients’ below your recipe to see each ingredient individually and make any changes accordingly.
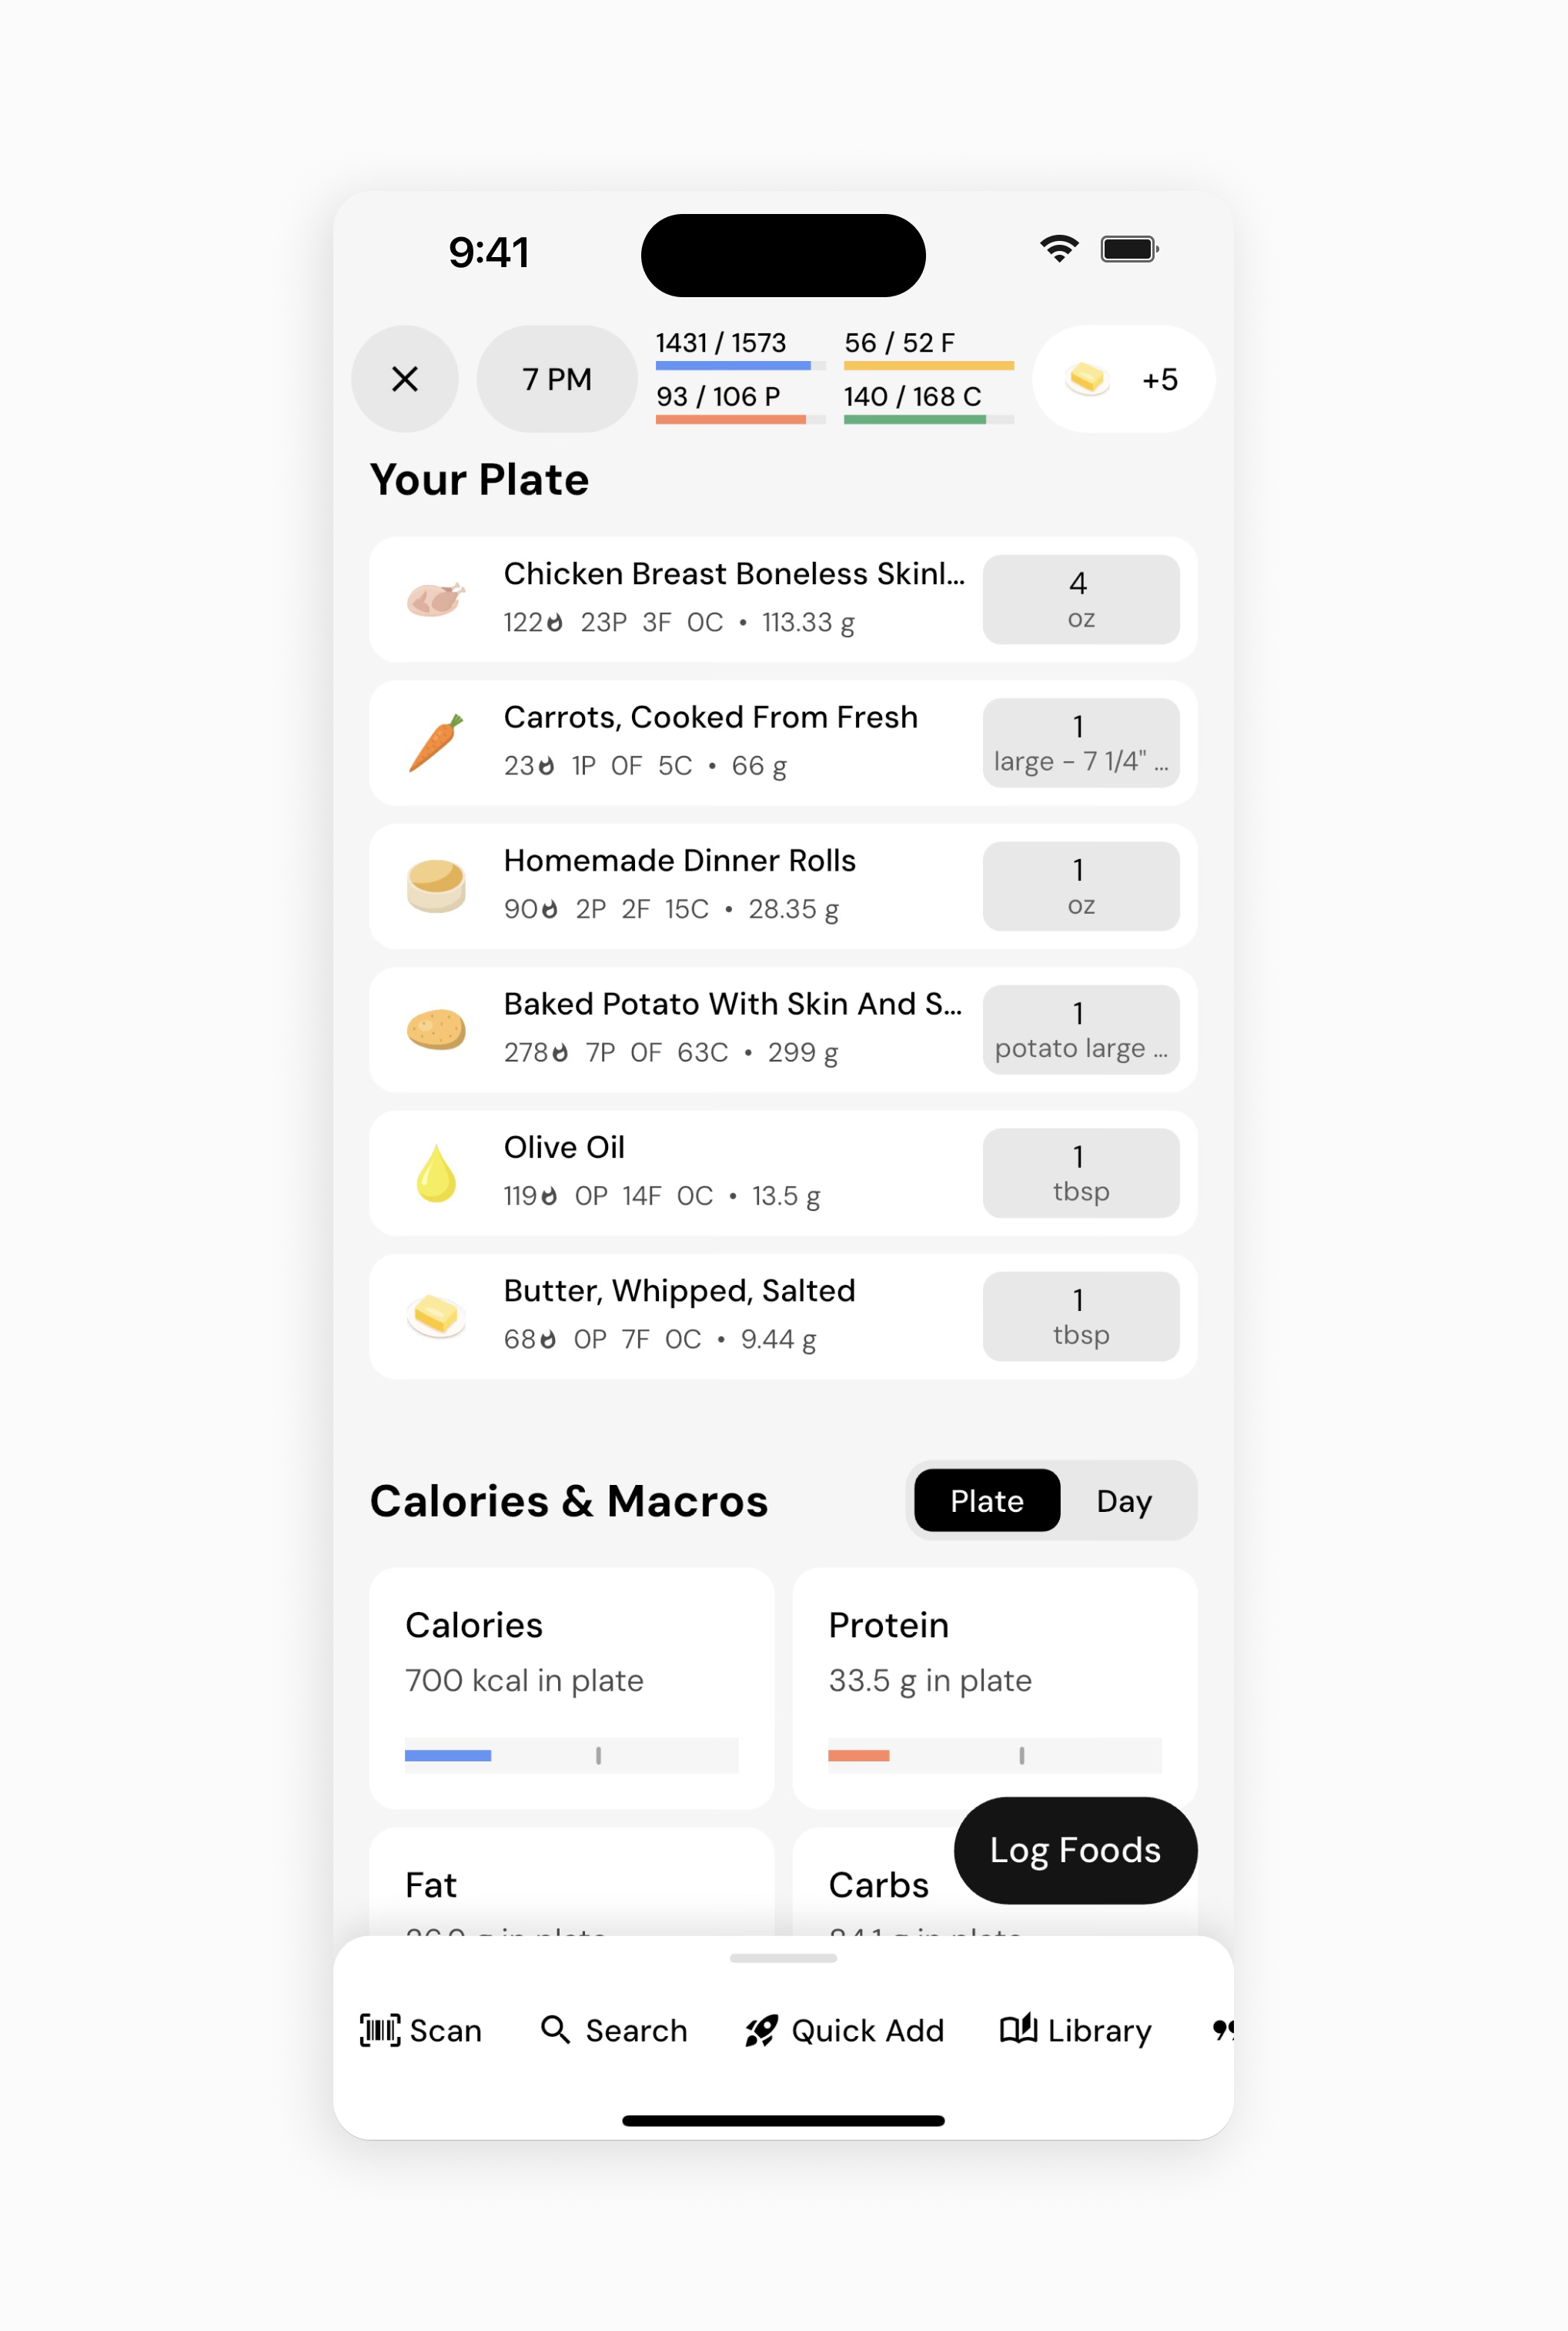
When you scroll down on your plate, you can view the complete nutrition information for the meal you’re about to log. You will have the option to toggle between your current Plate/Day to view the contents of your existing plate or the impact on your day, including foods that have already been logged. You can view the entire nutritional content of your plate by toggling “Show All Nutrients” on. This can enable you to make strategic decisions related to food portions – for instance, you could add all of the foods to your plate that you plan to eat, and then adjust serving sizes from your plate to ensure that the meal has the appropriate energy, macronutrient, and micronutrient content for your goals.
You will always be taken to your plate after adding foods via Describe. Since the natural language search won’t always return perfect results, it’s recommended to review the foods that Describe selects before logging your meal.
Even if you don’t swipe down to view your plate, you can see the foods you’re adding to your plate as you add them. When you add a new food to your plate, an icon representing that food will appear near the top of your screen, just below the bars showing your energy and macronutrient targets (depending on the Plate Banner options you’ve selected).
If you want to add more foods after viewing your plate, simply tap on any of the food logging workflows (Barcode, Search, Quick Add, Library, and Describe) along the bottom of the screen.
If you’re just logging a single food, simply select the food, enter the correct serving unit and serving size for the food, and tap “Log Foods.”
If you’re logging multiple foods, “Add” each food to your plate, and tap “Log Foods” once you’ve added all of the foods you’d like to log. Of course, you could tap “Log Foods” after each food, but doing so would result in a slower and less efficient food logging experience. Getting comfortable with MacroFactor’s integrated, plate-based workflows (adding foods to your plate, and logging them all together) may have a bit of a learning curve, but it unlocks the fastest food logging workflows on the market by saving you a few taps (and seconds) on each food you log, because you won’t need to re-launch the food logger between each food item; you can seamlessly keep adding foods until you’re ready to log the entire meal.
Finally, if you’d like to log a meal to a different day or time, you can do so by tapping the calendar icon at the top of the plate instead of tapping “Log Foods” when you’re ready to log your meal. Select the day and time you’d like to log to, and tap “Log to Date and Time.”
Now that you’ve learned how to log food in MacroFactor, you might enjoy one of these articles next:
How Do MacroFactor's Coaching Algorithms Deal with Partially Logged Days?