MacroFactor AI allows you to capture or upload a photo of your meal, and it will automatically populate your plate with editable food entries.
Tap the + icon.
Tap AI.
If the option doesn’t appear, you can configure your Shortcuts & Toolbar so it shows under the Favorites or All section on the shortcuts page.
Once you’re on the AI Food Log tab, you’ll see a few options. Each one analyzes the food in your photo and then takes you to the Plate view, where you can make edits:
Photo - Take a photo of your food, and the app will analyze it and generate results for your meal.
Photo & Text - Take a photo and add a description of your meal to improve analysis.
Upload - Upload a picture from your device’s photo library.
After the app analyzes your photo, you’ll be taken to the Plate view where you can make any necessary edits.
When you’re ready to log the food, tap Log Foods.
Use good lighting so that the AI can see what’s on your plate. (Take advantage of the flashlight tool on the scanner)
Make sure ingredients are fully in view (top-down photos usually work best).
Avoid stacking or hiding food so the AI can recognize everything.
Use the Photo & Text option to describe more complex meals.
Include your fist or a common object in the photo to help with portion estimates.
Photograph your plate with a food scale in view to reference the total weight.
In the first example, the meal was a delivery order with no available nutrition info, such as a barcode or label to scan. Even so, the AI was able to identify the foods in the photo accurately.
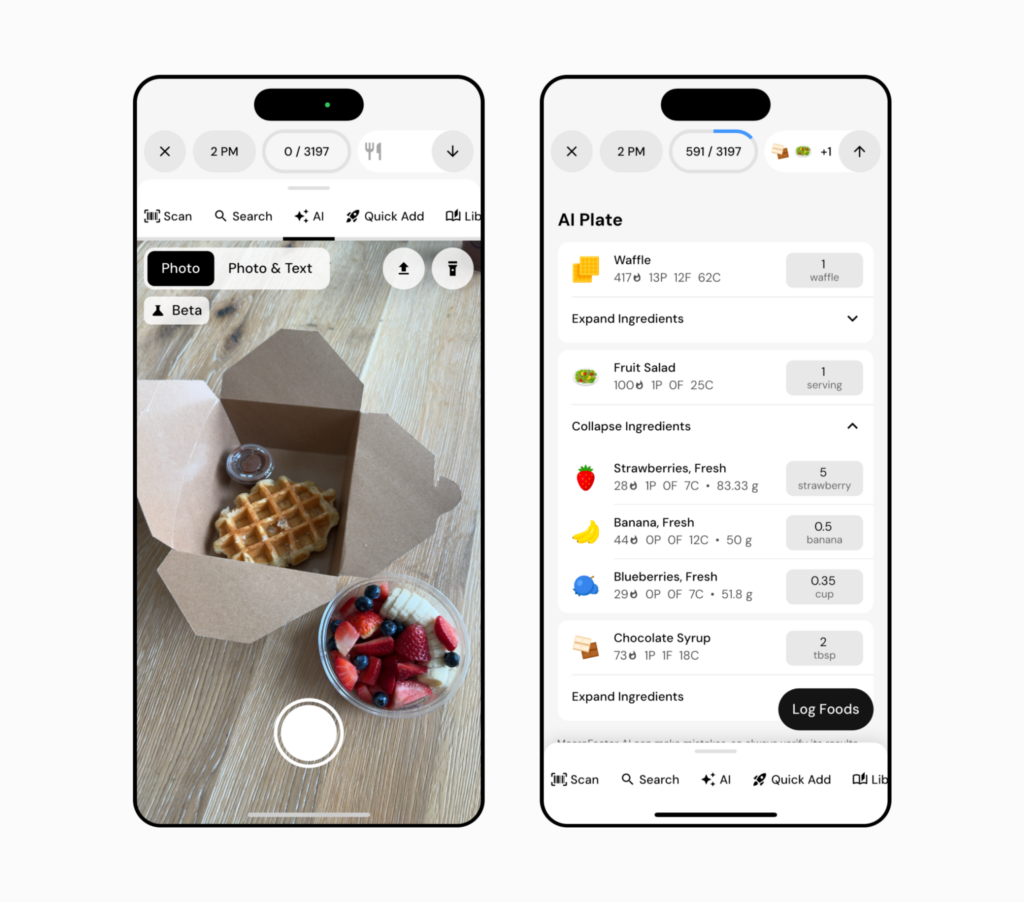
In the Plate view, you’ll see that the AI provides estimated serving sizes. Like with any food logging method, you can quickly adjust these amounts. If needed, you can also expand the meal to make changes to individual ingredients for more precision.
The AI identifies our second example as one recipe and 3 additional foods: a fried egg on toast, cucumber slices, red pepper slices, and olives. The fried egg on toast recipe includes individual ingredients that you can view by tapping ExpandIngredients or swiping to the left on the recipe and tapping Explode.
You might notice that the AI logs just one fried egg on toast, but a closer look at the individual ingredients shows it accurately captured everything in the photo: 2 slices of white bread, 2 eggs, plus the salt and pepper/
With that said, there is never any harm in taking a look at the listed ingredients to make sure everything in your meal was picked up correctly.
Let’s take a look at how AI handles branded products in this next example.
Instead of scanning each item individually with the barcode scanner, the Food Picture AI can capture all four items at once and search our database for matching branded products.
This last example covers a more complex meal. Before this feature was introduced, you may have experienced some difficulty while eating out, or not knowing the precise amount of ingredients used for a meal that you didn’t prepare yourself.
In this case, the AI does quite well at identifying orange chicken and vegetable fried rice, and it uses commonly associated ingredients to build a realistic entry for the plate.
However, let’s assume that the AI underestimated the quantity of rice in the photo. If you’re a more experienced logger, you will probably recognize when an estimate looks too small or too large for a specific ingredient. In this instance, it’s easy to edit the quantity of rice – you’re not obligated to stick with the AI’s original estimates.
The rice was detected correctly, and the serving unit is appropriate for this entry. Since you can always adjust the serving size in the Plate view, it’s easy to update the measurement to something you feel is more accurate.